
How to Add Google Analytics 4 to your Blog
This is how to add or connect Google Analytics 4 to your blog. Previously, I had posted an article about how to add Google Analytics tracking ID in UA format to your blog, assuming that you are using Blogger as your blogging platform, you can refer to that article if you have no idea of what is it about.
As you know, at the time of this article posted, Blogger only accepts UA format property ID while Google Analytics has been updated to GA 4. The tracking ID format of this new Google Analytics is different to the former. So, what you can do to connect Google Analytics 4 to your blog is by creating a new GA 4 property and copying the tracking code (some lines of JavaScript) and putting it between the <head> and</head> tags in your blogger template. Using this way, you don’t need to add property ID in your blogger setting.
If you had your blog connected to the old Google Analytics, you may be asking why you should use the new Google Analytics. It is important to connect with the GA 4 because it has updated its features so that you can get deeper insights about your blog visitor, performance, and behavior.
Another question you may be asking perhaps whether to delete your old Google Analytics property. In my opinion, you should delete your old Google Analytics property so that your GA account is clean and easy to read. Moreover, leftovers may result in multiple reading which is useless for you.
How to Add GA 4 to Blogger
This is how to connect GA 4 to your blog.
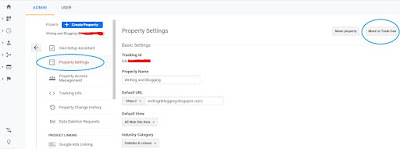
- Go to your Google Analytics account and select Admin
- Under Property, select the property that you want to delete
- Go to property setting
- Click move to trash can (this will open a page where you can confirm to delete this property. If your property has linked to Google AdSense, you will be prompted too. Don’t worry, you can relink your Google Analytics and Google AdSense in your new GA property).
- Click Delete property (this will schedule the property deletion).
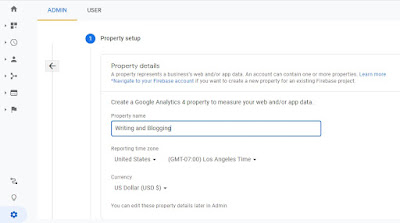
- As you are brought back to the property page, click create property
- Under the property setup, enter the property name as you wish. In this example, I use Writing and Blogging as property name.
- Set the reporting time zone and the currency as you like.
- Click next
- You will be asked to enter the industry category, business size, and so on. These are optional so you can set it or just skip it.
- Click Create
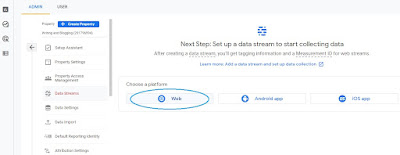
- Now, you will be asked to choose the platform. Since you are a blogger, select Web.
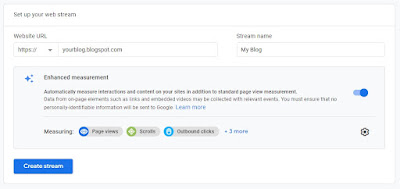
- Enter you blog URL and name it (e.g. my blog or my web)
- Click Create stream (you will be brought to a web stream details)
- Scroll down and find Tagging Instructions
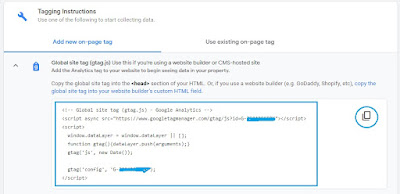
- Under the tab Add new on-page tag, click Global site tag. You will see some lines of JavaScript.
- Copy the code
- Go to your Blogger dashboard
- Click Theme
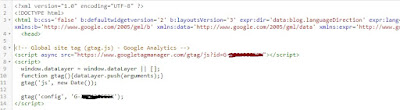
- Click the down arrow beside Customize and click Edit HTML
- Paste the code you copied from Google Analytics right under the <head> tag
- Save your blogger template
That’s all you need to do to connect Google Analytics 4 to your blog. It takes time to load the stream data of your blog. Therefore, at the first, you will see that the stream shows no data. It is fine since Google Analytics treats your property as a new property.
Please, only relevant comments are accepted. Comments that are irrelevant and/or containing active links will be deleted. Thank you.
Post a Comment for "How to Add Google Analytics 4 to your Blog"